--------------------------------------------------------------------------
ABS/TC tuli põlevad ning spidomeeter ei tööta - esimene asi on kontrollida üle abs andurid rataste juures ning vajadusel need puhastada, kui see probleemi ei lahenda tuleks kuskil töökojas kontrollida kas Tech1 v Tech2 (diagnostika seade) suudab ABS/TC ajuga suhelda, kui ei siis on aju tuksis. Kahjuks pidi peale 98 valminud masinatel suht tihedane probleem olema
-------------------------------------------------------------------------
Automaatkast käitub imelikult - üle tasuks kontrollida kasti pistik, samuti õli olukord (kas on puhas ning kas seda on piisavalt), kui vahetuseks läheb siis vana õli välja lastes vaata üle ega metalli tükikesi sees pole sest siis on kastil miskit tõsisemat viga ning vaja ilmselt täiesti laiali võtta
------------------------------------------------------------------------
Tuulutuste puhastamine V6'el
Hetkel ingliskeelne -
Standard safety advice applies, such as disconnect the battery, etc. No wiring connections need to be seperated.
It is an idea to place some rags in the inlet trumpets, to prevent anything falling in.
This job compliments the Cam Cover gasket change job well, and is best done at the same time to reduce the chance of re-failure.
1 - Remove the scuttle.
2 - Remove the plenum chamber, as this will need a clean as well.
3 - Using carb cleaner, or paint thinners (work just as well) clean the plenum, around the throttle body especially.
4 - I then removed the black ECOTEC bit (1 torx bolt) and prised this off the plenum, blast it through with either some carb cleaner, or a combination of thinners and tap water/the high pressure attachment on a hose pipe.
5 - Blast the ECOTEC bit through with WD40, just to dry it out.
6 - Remove the big black, dual outlet breather pipe, which is located on top of the breather box.
7 - Attach this to your hose point on your tap, and blast through with water, you'll be surpised at the amount of crud that comes out.
8 - Spray some carb cleaner into the breather box, NOT TOO MUCH though.
9 - Use a screw driver, place into the breater box and scrape as much of the gunk from the neck of the pipe as you can.
10 - Don't go too deep, about 1 1/2 inches is enough.
11 - Remove the small breater pipe and use a pin to clear the little hole that is in the centre of this pipe neck.
12 - Blast the small pipe through with carb cleaner, or thinners and water, spray in some WD40 to dry it out again.
13 - Re-assemble, replace the O rings on the inlet bridge.
Sisselaske kollektori eemaldamine -
You need to disconnect the Throttle position sensor and the Idle Air control valve needs to be removed.
1 - Remove the trumpets from the front of the plenum
2 - Remove the IACV, this just pulls out, the pipe from this can sit to one side for now
3 - Cut the metal tabs holding the vacuum pipes on, and pop the pipes off.
4 - Remove the torx bolts on the plenum
5 - Remove the torx bolts holding the egr assembly on
6 - Lift the plenum away and clean as detailed above.
---------------------------------------------------------------------
Soojendusradika klapi vahetamine -
jällegi ingliskeelne
The failure of the heater bypass valve can be seen in a couple of ways.
1 - Water leaking around the back of the engine
2 - Air being drawn into the system, causing over pressurisation.
Replacement is not all that complex and takes around 2 hours, if there are no complications. Below I have detailed the steps to removal.
- Have a tub to collect all the parts in.
1 - Remove the front air pipes from the multiram.
2 - Remove the IACV
3 - Unplug the TPS sensor plug
4 - Remove the torx bolts from the EGR bracket.
5 - Using a 17mm spanner to hold the mounting point, and a 19mm to undo the collar, remove the brake servo pipe.
6 - Remove the bolts from the plenum chamber, remove plenum and place to one side.
7 - Remove the wipers
8 - Remove the scuttle.
You will now be able to see the heater bypass valve. It has a vac pipe going into the top, and three coolant pipes coming into it. There may be some water staining around the area, which is a sure sign that something is not quite as it should be.
At this stage I tend to unplug the large pipe going into the brake servo and move the whole lot to one side. For reference, it may be an idea to mark each pipe to connector, with some different colour paint pens. Else, from what I observed, the pipes goto the following areas.
Nearer servo
2 connectors, total of three pipes. Single pipe goes to vac resevoir above pollen filter. Double pipe, one to car interior, other to front of car.
The vac pipe atop the heater bypass valve goes into the car interior.
NEXT STAGE
1 - It is recommended to drain the cooling system before proceeding.
2 - Carefully remove the vac connector from the top of the HBV.
3 - Undo the single pipe on it's own, plug with rag and place rag under it to catch any drops.
4 - Remove the double side pipes, remembering where they go.
5 - Offer up new HBV, and plump in.
6 - Plug back in vac pipe and valve should naturally sit round the back of the engine, near the bulkhead.
WORST CASE
I found on the car I was working on, that a previous owner had pushed the pipe going from the HBV to the interior, just into the hole, as it had snapped off. If this pipe if not connected, you have no vacuum, and no heat. I effected a repair in the following manner. Ideally you'll need more than one person to assist you.
1 - Find a small piece of rubber hose, large enough to accept the plastic heater bypass hose.
2 - I found the rubber tube I used (around 8mm diamater) large enough to sit into the recess on the rubber bung where the two matrix pipes and other vac pipe go.
3 - Using hermatate and some glue, fasten the pipe here, hold in place and smear the hermatate round for a good seal.
4 - Holding the pipe, carefully push the heater bypass plastic tube into there.
5 - Hold in place for a further 3/4 minutes to let the glue and hermatate set.
The ideal fix is to trace the vac pipe back (I believe it goes to the dials on the instrument panel) and replace the pipe, but this fix seemed to work for my situation.
RE-ASSEMBLY
Re-assembly is reverse of removal. You can attack the following job whilst all the area is stripped.
Re-assemble and refill the coolant . Take the chance to flush the rad through, and the system if required. Make sure both heather controls are on full hot.
Run the engine up to temperature, and check the HBV for leaks. Also check the heater is blowing hot. If it is, the issue is resolved.
SCUTTLE RE-ASSEMBLY
A little trick pioneered to good effect by Eighth_dwarf, is to smear some vaseline around the mounting foam bit around the wiper spindles. When the scuttle goes back down, this will allow the scuttle to seal. We have discovered it can leak, in some cases, all over the drivers side rocker cover!! (not good).
POSSIBLE FUTURE PROBLEMS
If the unit has been spraying water, then the DIS pack may have limited life left. Be prepared to budget for a replacement.
--------------------------------------------------------
Õlijahutusradika vahetus:
Well, the Vauxhall V6 oil cooler. An interesting design, that makes good use of the space inbetween the cylinder heads. Here something akin to a minature radiator, sits quite happily, exchanging heat from the oil, with the engine coolant. The design works well, until you need to replace the oil cooler.
Typical signs of failure start with the coolant turning brown, and exhibiting a slightly oil tinge to it. Complete failure results in clogged radiator, and a sludge forming in the header tank.
These are the materials I would recommend purchasing.
Oil Cooler
O rings for cooler bolts
O rings for coolant channel bolts
Orange gaskets for inlet trumpet mounting bracket
Black O rings for Plenum to trumpet mounts
6 litres of 10W40 oil
5 litres of Anti-freeze (red or blue)
Tin of Radiator flush
Tube of Vauxhall sealant for this job
One of those bathroom sealant type guns (sealant needs this to be applied)
Oil Filter
6 Spark plugs (you may as well do these)
Thermostat and gasket, unless they use
Pack of permanent colour markers
Tools
A good toolkit is required, with a selection of Torx and star drive style sockets.
There is quite a bit of deck clearing in order to get to the cooler. Lets start at the front, and work our way back.
There is a large metal induction pipe, complete with a valve, and a couple of wiring connectors. This is used for the tuned induction system the Omega employs. Around 4 6mm jubilee clips hold this on, with the left hand top pipe, having a small pipe leading off it to the back of the engine. Take the right hand one off completely, and just put the left hand one out of the way for now. I think there is also a pipe connected to the idle air control valve. Disconnect this.
3 10mm bolts hold the metal unit in. Undo these bolts, and using one of the colour markers, you can mark which vaccuum pipe goes to where on the vacuum resevoir. A couple of vacuum pipes come up to points where they can be disconnected, just un-attach them, marking with marker pen, so you know where they go back.
The unit and be wriggled out, I found left side up and out. Ensure all wiring connectors are undone. One is attached to the airflow meter, another to the valve, and another to an air temp sensor.
Now you have the front of the engine bay clear.
I them removed the idle air control valve, and sprayed in some carb cleaner, and placed it to one side.
Prise off the ecotec cover to reveal a torx bolt. Undo this bolt and place in a box.
Undo the three bolts on the side of the plenum, where the exhaust recirc affair sits. Recover the gasket for later.
Undo both small coolant pipes on either side of the plenum chamber. These are used to heat up the inlet tract for more efficient fuel atomisation, and probably to stop carb icing.
Prise up the 4 black things, to reveal 4 more torx bolts. Undo and remove these.
Undo and remove the throttle cable and bracket. Al little pin clip holds the ball end of the cable, onto the linkage. Carefully remove and recover this for later.
The plenum chamber will be free to move, I found a couple of wiring connectors, which I undid, cut the metal clips on the crankcase pipes, and remove this pipes.
It's easy to get to these sitting in the engine bay, as the picture shows.

You will now see the small pipe from that left hand hose, it goes to the fuel pressure regulator, remove the pipe and place to one side.
I then undid the injector wiring connectors, to gain better access to the 6 torx bolts. To do this, use a flat blade to prise off the wire holder, carefully so you don't lose it. Then remove the connector, and place this wire clip back on it. It'll just click in on replacement. This does not have to be done, but it made getting to the torx bolts a lot easier.
6 torx bolts now, use a strong magnetic probe to extract them, I just left them in the trumpet housing as I did not have one of these, and recovered it later.
The trumpets will left, recover the bolts, and your faced with the mounting bracket. Loads of torx bolts, and this will come off.

Now is a good time to drain the coolant and oil, if you have not already done so.
To the back, there will be a coolant transfer channel, this transfers coolant between heads, two hollow bolts hold this on, remove and locate the unit out of the way.
I now plugged the inlet ports with tissue, and undid the bolts holding the pipes to the oil cooler. Now I bent these out of the way, but you can undo them down at the oil filter, two 19mm nuts hold them in. This is the preferred approach. It'll allow you to at least move them out of the way.
'I simply used a large set of stilsons on the main filter housing body, it then un-screws, a filter strap wrench should also be able to do the job.
It requires a new seal on re-fitting.
Should be easier on units with a metal oil filter.
Its important to use a flair nut spanner on the pipe unions at the filter end to avoid distortion of the fastening.'
Having the right tools at this point is essential.

Using a 30mm socket, a universal joint style flexi joint, an extension and breaker bar, I undid the back oil cooler nut. The front one can be down with the flexi joint. This joint allows you to get into the area under the scuttle, a similar joint can be employed with removing the plenum chamber, the bolt near the back.
Now remove each of the little star drive bolts on the cover, and remove the cover. I found right side up, and out worked best. The cooler is now exposed in all it’s sludgy glory.
Remove the cooler.

This is what the old cooler looked like.

I mopped the area out with kitchen roll, but a far more successful approach will be to vacuum out the remaining water, using an Aqua Vac, or VAX or similar, then clean the area out completely.
Clean the mating surfaces down, and use some white spirit (thanks Mark ) to ensure that the area is 100% free of grime, else things will start leaking a few miles down the road.
Reassembly. Once your mating surfaces are clean, and you have replaced the thermostat, I placed a bead of sealant on the cover, and also round the entire edge of the cover area. Left side down and in, then in works best. I finger tightened four bolts in each corner to locate the unit, then did a spiral out from the centre to tighten, once I had placed all the bolts in finger tight. It’s best to use a Haynes manual torque figure to get the figure, and measure with a torque wrench, as a gauge, just over ratchet tight is enough, or seemed to be, best to go by Haynes on this one though.
I placed a small bead of sealant around the oil cooler protusion, then finger tightened the 30mm nut on both. Use the new nuts supplied with the cooler. Tighten fully to specified torque figures, you’ll see the sealant splurge around the edge, but it’ll be sealed right in the centre, where it is needed. If you have bent the cooler pipes back, you need to get an assistant to force them down and back forwards with a length of wood, whilst you twiddle the hollow bolt (complete with new O rings) into the cooler. If you have un-attached them, they should go in easy. I found the front one easiest as it had most length and leverage. Next mount the coolant bar, and tighten the hollow bolts, with new washers, to specified ratings.
Get your trumpet mounting bracket and replace those orange gaskets, then mount it on. The bolts are the same length as the ones used on the trumpets to bracket, but I found some locking compound on the bracket to block ones. Apply some of this if you desire, to each bolt, and tighten finger tight. I fully tightend in a spiral sequence.
The trumpets are next. I placed them down, and carefully mounted a bolt on the end of my torx bit, and extension. I lowered it down with my finger pressed to it to hold it, and carefully tightened. This worked for all six, but have the probe to hand. Tighten again to Haynes specs. Plug in the injectors.
Replace the black O rings ready.
All this time, your plenum has been waiting. Clean out the carb cleaner, and clean the butterflies. Mount the plenum vertically and place the black ecotec bit in. Lower the plenum and tighten the bolts. Re-attach all items, replace the large item and re-connect. Put a new filter on, and fill with oil and plain water. Add your radiator flush item, and start the engine.
I left to run for 5 mins, then I dropped the water, and flusher the header tank with water, till clear, removed the top hose and flushed the rad till clear. I re-assembled everything, and filled with the anti-freeze mixture. You’ll need to do another change in a month, to clear out any excess oil, but that should be it.
-------------------------------------------------------------------------------------
Automaatkasti õlivahetus -
Seeing as there are some auto trans questions popping up, I thought I'd do my write up for changing the fluid. Add any additions you feel relevant.
This information covers the earlier 4 speed box, 5 speed procedure may be similar.
Opel/Vauxhall in all their wisdom, decided not to fit a drain plug or dipstick to the transmission. This makes changing and checking the fluid a bit of a difficult process. However, as I found the other weekend, it isn't as hard as it first seems. You'll need the following items.
1 large gearbox sump gasket
1 oil filter
1 small sump gasket (there are two)
1 O ring for sump bolt
A large selection of rags and newspaper
Some axle stands, or ramps ideally
7 litres of Dextron 3 transmission fluid
A tin of Wynns auto transmission stop leak (optional)
Make sure that some of the dex is supplied to you in a 1 litre bottle with tube on the end, you'll be needing this .
Get the car raised up, and undo the fill plug. Let the old fluid drain into the bowl you have placed underneath. APPLY THE HANDBRAKE AND CHOCK THE REAR WHEELS
Remove all the bolts around the edge of the large sump, put them in a safe place. There are around 16 of them to remove.
Place a trolley jack and block of wood under the sump, and support it. Get a block of wood and place this between the hammer and sump, give a couple of short taps with the hammer, on the wood, to shift the sump. Lower the jack carefully. The sump will be full of oil, so watch for this. I got it all over the drive when I did it, so be careful. Dispose of the oil in the bowl, and remove the sump.
Now remove the small sump and bring both out. Clean both sumps thoroughly, and remove any gasket material from the face of the sump flange. I used a paint scraper and some white spirit to get a nice clean surface, repeat this procedure on the box itself. Be careful not to damage the mating surfaces.
I left the bowl under the box for an hour, and cleaned the sumps completely.
Get your large gasket and match it up to the large sump. Get under the car and offer the sump up to the box. Whilst holding the sump, place a bolt in each of the four corners, finger tighten for now. Place in the other 12, all finger tight. Ratchet tighten in a corner opposite corner, opposite end corner corner fashion, or a criss cross fashion.
Check each bolt is done up to haynes torque figures.
Get your 1 litre bottle and squeeze fluid into the box.
Refill the bottle and repeat till fluid comes out the fill hole. Place the plug back in and start the engine.
Beware of one of the cats, that'll be above your head.
Remove the plug, worry not, no fluid will be ejected under high pressure, as it'll all be slurping around the box, under high pressure. Continue filling again until fluid can be seen escaping.
Place in the fill bolt. Get the car off the ramps, and select all gear ratios. Take it for a spin, and on your return, check the fluid levels once more.
And that's all you need to do. Dispose of the old fluid safely, via your local recycling scheme, or used oil bank.


-----------------------------------------------------------------------------
Pärast aku eemaldamist akende ja luugi automaatika taastamine :
Kui oled aku korra maha võtnud siis lähevad el. aknad ja luuk tehase seadesse tagasi e siis ei tööta enam automaatselt sulgumine/avamine ühe vajutuse peale....
Et uuesti aktiveerida - Aken on suletud asendis vajutad akna sulgumise nuppu ja hoiad 2-3 sek all...relee teeb klõpsu ja automaatika on tagasi....tuleb iga akna jaoks eraldi korrata...
Luuk käib vähe teistmoodi - Luuk on kinnises asendis, vajuta sulgemise nuppu ja hoia 2 sek all, siis lase luuk täitsa tagumisse asendisse ja korda seal sama protseduuri , siis kaldusasendisse ja uuesti ja voilaa
------------------------------------------------------------------------
Mida siis tuledega teha kui üldse ei näita
Kõigepealt kontrolli tuleklaasid ja reflektorid üle...kui reflektorid korras ja klaasi tuhmunud siis aitab poleerimisest(kui on tegemist plastikust tuleklaasidega). Kui reflektorid põlenud siis on aeg uued tuled osta.
Järgmiseks mõtle üle millal viimati pirne vahetasid, ka pirnide valgusvihk tuhmub ajapikku...ning see et mõni pirn põleb tules aastaid ei tähenda et teda vahetada ei tuleks
Hea pirni ostmine on aga paras keeruline protseduur, sest olgem ausad neid on palju ja iga tootja kiidab enda oma. Kui tahad sinakat valgust ning HID (rahvakeeli xenoon) lampe ei raatsi osta siis siniste pirnidega arvesta nõrgema valgusvihuga, sest see ilus sinine klaas peatab osa valgusest, seega kui tahad maksimaalset valgustugevust siis osta korralikud tavalised pirnid või HID lambid.
Erinevatest pirnidest hea ülevaade siin, testid tehtud küll H4 pirnidega kuid annab kerge ülevaate toodangu erinevustest
http://www.eol.ee/~margus/new/lamptest.htm
Valgustugevus kõigub erinevatel pirnidel üsna palju
Viimaseks mõõda üle pinge pirnide juures, need viimased paar volti (12-14.5V) mis väsinud kontaktide kaudu kaduma läheb ajapikku mõjutavad valgustugevust väga palju. Eeldades et laadimine on muidugi korras ja töötava mootoriga on aku juures mõõtes pinge 14V lähedal.
Kui pinge on 12-13V töötava mootoriga pirni juures siis on aeg mõelda kas kontaktide puhastamisele v siis uute juhtmete vedamisele. Uued juhtmed vaja vedada ainult akust tuledeni ja siis relee vahele panna mille ergutus võtta vanast tule juhtmest.
Kui ikka väheks jääb siis võimalus on ka 100W pirnide kasutamine (luuptulede puhul ei soovita), sellisel juhul tuleks kindlasti uued jämedamad juhtmed vedada. Oht on aga et pikapeale rikub suur kuumus tule ära. Ise soovitaksin sellisel juhul kui lähi ja kaugtuledes on 100W pirnid, parktulede asemele 21W pirnid releedega panna mida päevasõidu tulede asemel kasutada et 100W pirn koguaeg lampi ei piinaks, eriti kui valgust päevasel ajal vaja pole, aga tuled peavad põlema.
Teine võimalus on ka lisatulede paigaldamine, kui aga lähituled kehvad on siis lahendab see ainult pool probleemi
Hetkel kõik:)
--------------------------------------------------------------
Pagasi luugi tüütu featuuri eemaldamine vanematel facelift omegatel
The early facelift Omegas have a very annoying boot release 'feature'.
The boot cannot be 'popped' from the centre console button, unless the engine is off and ignition key removed.
Later facelifts had this feature removed.
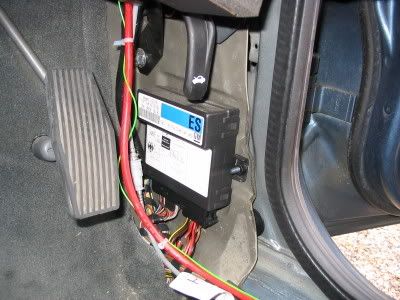
To remove it yourself, simply detach the driver kick panel by undoing two Torx screws. (The bottom one is hidden under the sill cover. Lever off the VX logo plate on the sill cover to reveal the 4 Torx screws under it which retain the sill cover).
This reveals the 'Anti theft warning and central door locking control unit'
It has two plugs on its lower edge. A big one and a smaller 12 pin one. (On right in picture).
On the smaller plug, locate the two red wires.
Cut the thinner of the two red wires (Pin 3).
This is the 12v supply from the ignition switch 'W' contact when the key is in the lock. Without this supply, the remote boot release is always enabled.

Tape the bare cut end from the loom. (Shrink tube is better).
The finished result. An action shot of the boot 'popping'.

Edit. I must add a disclaimer here! There will be no delay on the button activating the lid, so it's possible to accidentally pop it. Especially important for estate owners.
Kõik need õpetused on siia foorumisse jõudnud tänu priitcce`le !